How to Build, Train and Deploy Your Own Recommender System – Part 2
We build a recommender system from the ground up with matrix factorization for implicit feedback systems. We then deploy the model to production in AWS.

We’re back to continue the Website Performance Series, after discussing a leadership topic in the last update. I received good feedback from that, getting some readership from people who normally would not spend time in a technical blog like this.
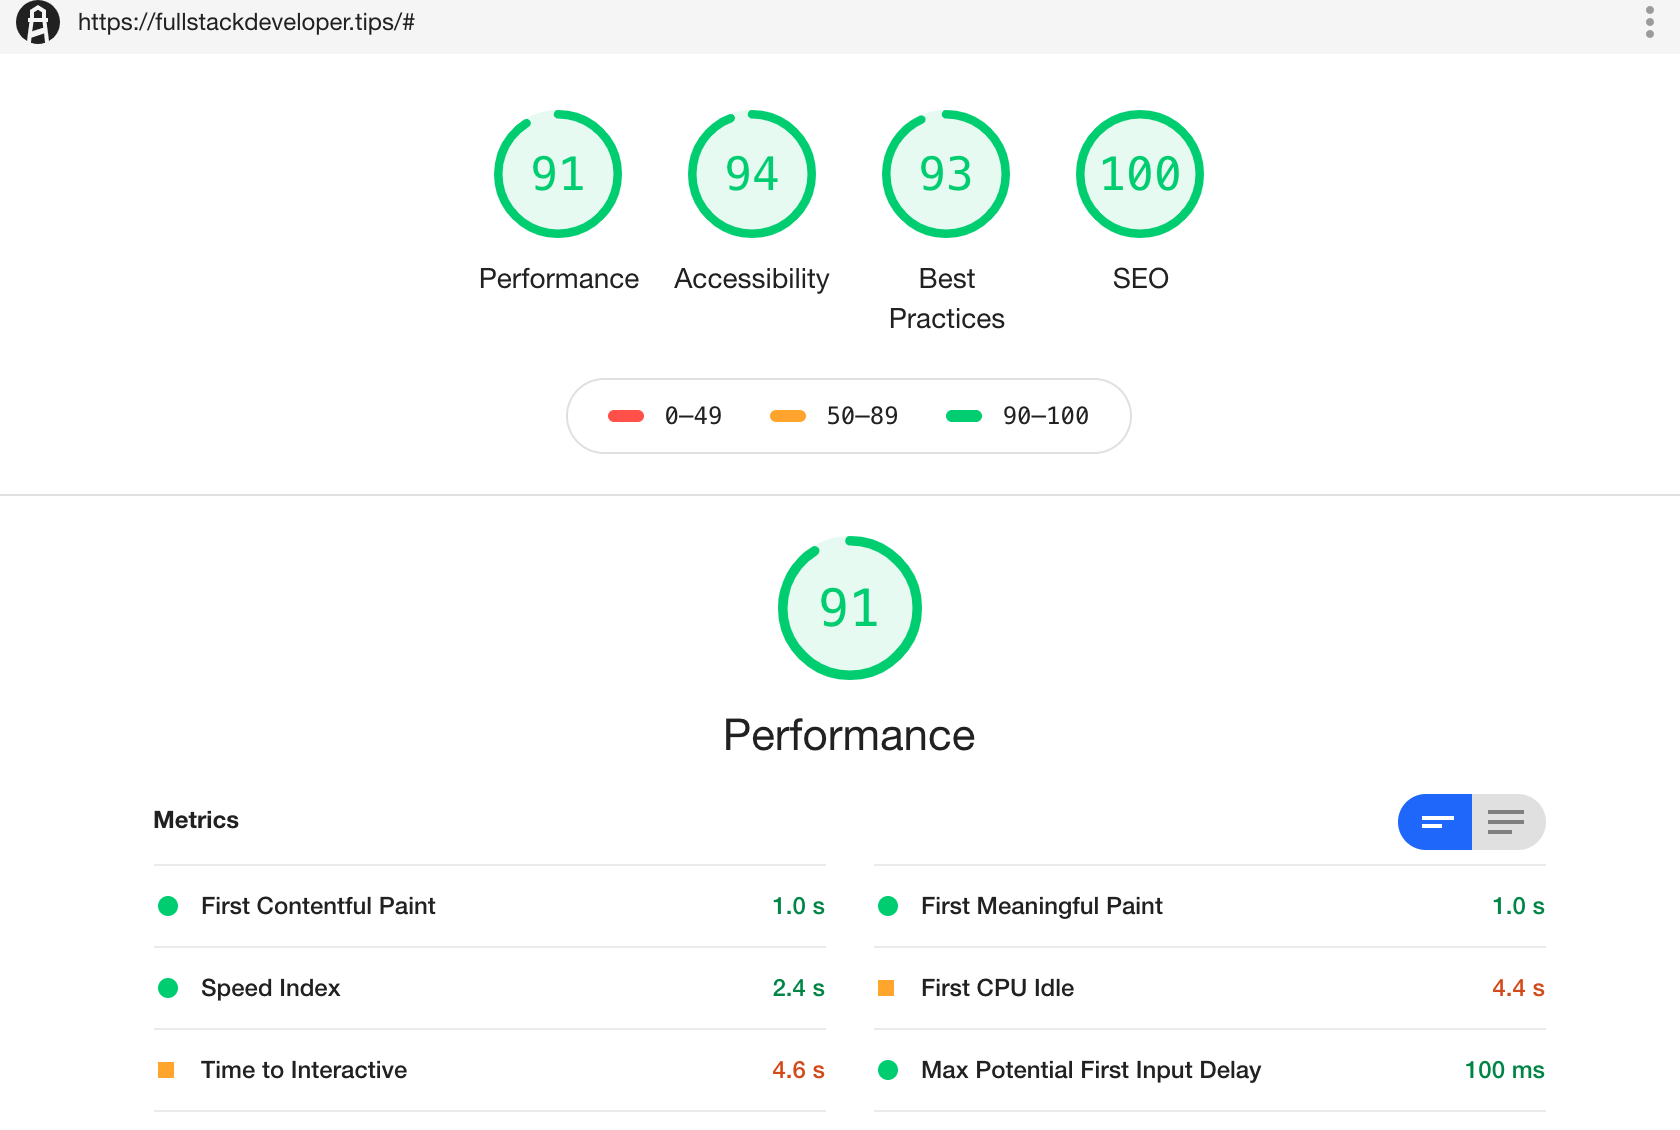
In this installment, we will be running Lighthouse against this blog, and see if we can implement some improvements identified by the tool. I know that this is a pretty tiny website, however the principles will remain the same. It is good that I can demonstrate this in a much smaller scale, small baby steps that will increase our familiarity with the tool, and of course our confidence as we apply these learnings in our own projects.

We didn’t really do too bad, with a Performance score of 77, which positions us in the orange rating, however green is better, right?. Also we have scored favorably with the other categories - Accessibility, Best Practices and SEO. If you recall the Lighthouse metric weights that we covered in Part 3, the highest weight at 5x is Time to Interactive (TTI). It is not immediately obvious what exactly is required to better our TTI results, however, Lighthouse has given us some tips in the next section of the report.
For this simple site, there is just one major issue category really. All the opportunities for improvement is related to the site images. Obviously our use the Minimal Mistakes Jekyll theme helped a lot in us scoring highly in the other categories. These minor image issues are caused by no other than yours truly, but they were quite easy to rectify*.
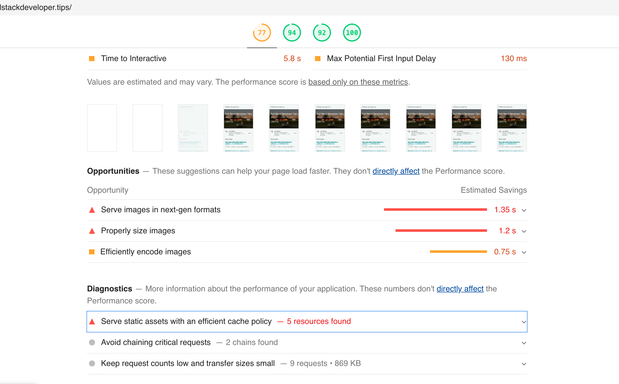
There is a long list of improvement suggestions from Lighthouse, but the following are noteworthy:
In our case I have chosen to use Google’s WebP format instead of the usual PNG and JPG formats. For the same quality, WebP typically achieves about 25% to 35% smaller files than PNG and JPG for the same visible image quality. However the only problem against this clearly more superior data format is that not all browsers support it, even though WebP has been around since 2010.

Using WebP is straightforward when using the Html picture tag. It is not that obvious when you need to support WebP in CSS, such as when you need to set the background of an html element. Unfortunately, this website uses Jekyll and that generates a static site at build time, we could not do it in CSS, because we need to check WebP support of the browser at runtime, and that just would not work here. Here is a guide on how you can achieve support for WebP for both Html and CSS.
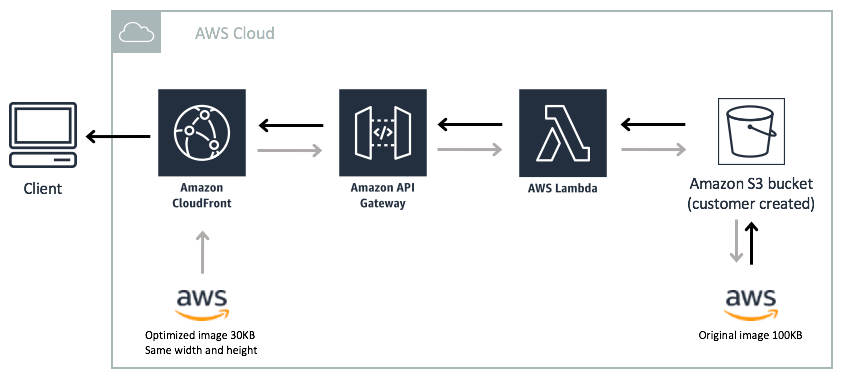
If you have thousands of images, and if you did not want the overhead of running a script at build time to generate WebP versions of your images (you would still need the jpg versions created for fallback), you can use an image handler that supports runtime conversion to WebP format. In a previous post, I discussed how to create an AWS image handler quite easily. We can use AWS Serverless Image Handler - either v3 or v4 has support for runtime WebP format generation. It even has CloudFront in front of it to provide cached access to the API.
The images that you host on your website should be the optimal quality for the page it is in. Ideally you should not serve images that are larger than required for the user’s screen. This means that using a single image to serve your multiple page breakpoints to support responsiveness is probably not the best way to do it. You can have as many versions of the image as you have breakpoints, I know this is more work however, there are tools that can assist in automating the generation of these multiple formats. More detailed suggestions can be found direct from the source.
Ask for gzip compression from your server. And if your server supports it, it will respond with compressed payload. Of course because Github pages used Nginx under the covers, it supports gzip compression and we get that by default.
To instruct the browser to cache your static pages, you can change the Cache-Control header to have a longer time. For this site, Github Pages fixed the max-age to 600 seconds or 10 minutes, after which it will need to fetch from the server again. Lighthouse complains that 600 seconds is not enough, so you could try 86400 seconds which I know it is fine with.
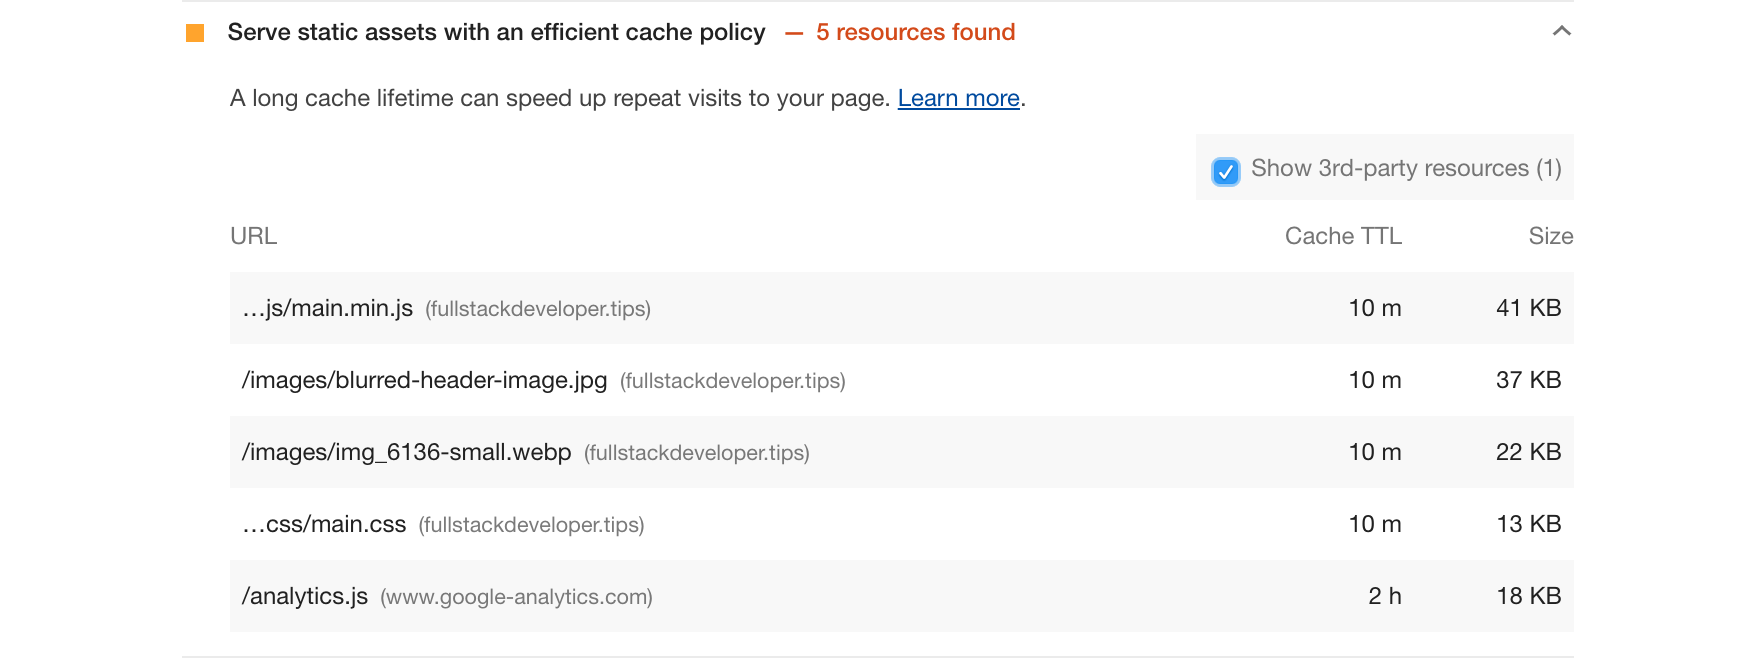
A big gotcha here is that you cannot change your response headers in Github pages so you will be stuck with 10 minutes, which will not make Lighthouse happy. However, check out the use of this method, or use Netlify to enable you to change headers and more.
Another option is to use resources in CDN. For example for the FontAwesome file https://cdnjs.cloudflare.com/ajax/libs/font-awesome/5.7.1/js/all.min.js, instead of hosting it myself, and be limited by the max-age of 600 seconds imposed by Github pages, I decided to use FontAwesome CDNs which have a max-age of 86400 seconds. Plus you get the advantage of the multiple edge locations that the CNDs can give you.
Finally we have achieved all green! If this was an important page to you, then this is the perfect time to run your experiments with the many packages like Optimizely, or Freshmarketer.
It is counterproductive to start split testing activities until you have high scores in Lighthouse.
From this post onwards, I plan list down a couple of my choice picks, which doesn’t have to be software related, it just needs to have had an impact to me in the past couple of weeks:
We build a recommender system from the ground up with matrix factorization for implicit feedback systems. We then deploy the model to production in AWS.
We build a recommender system from the ground up with matrix factorization for implicit feedback systems. We put it all together with Metaflow and used Comet...
Building and maintaining a recommender system that is tuned to your business’ products or services can take great effort. The good news is that AWS can do th...
Provided in 6 weekly installments, we will cover current and relevant topics relating to ethics in data
Get your ML application to production quicker with Amazon Rekognition and AWS Amplify
(Re)Learning how to create conceptual models when building software
A scalable (and cost-effective) strategy to transition your Machine Learning project from prototype to production
An Approach to Effective and Scalable MLOps when you’re not a Giant like Google
Day 2 summary - AI/ML edition
Day 1 summary - AI/ML edition
What is Module Federation and why it’s perfect for building your Micro-frontend project
What you always wanted to know about Monorepos but were too afraid to ask
Using Github Actions as a practical (and Free*) MLOps Workflow tool for your Data Pipeline. This completes the Data Science Bootcamp Series
Final week of the General Assembly Data Science bootcamp, and the Capstone Project has been completed!
Fifth and Sixth week, and we are now working with Machine Learning algorithms and a Capstone Project update
Fourth week into the GA Data Science bootcamp, and we find out why we have to do data visualizations at all
On the third week of the GA Data Science bootcamp, we explore ideas for the Capstone Project
We explore Exploratory Data Analysis in Pandas and start thinking about the course Capstone Project
Follow along as I go through General Assembly’s 10-week Data Science Bootcamp
Updating Context will re-render context consumers, only in this example, it doesn’t
Static Site Generation, Server Side Render or Client Side Render, what’s the difference?
How to ace your Core Web Vitals without breaking the bank, hint, its FREE! With Netlify, Github and GatsbyJS.
Follow along as I implement DynamoDB Single-Table Design - find out the tools and methods I use to make the process easier, and finally the light-bulb moment...
Use DynamoDB as it was intended, now!
A GraphQL web client in ReactJS and Apollo
From source to cloud using Serverless and Github Actions
How GraphQL promotes thoughtful software development practices
Why you might not need external state management libraries anymore
My thoughts on the AWS Certified Developer - Associate Exam, is it worth the effort?
Running Lighthouse on this blog to identify opportunities for improvement
Use the power of influence to move people even without a title
Real world case studies on effects of improving website performance
Speeding up your site is easy if you know what to focus on. Follow along as I explore the performance optimization maze, and find 3 awesome tips inside (plus...
Tools for identifying performance gaps and formulating your performance budget
Why web performance matters and what that means to your bottom line
How to easily clear your Redis cache remotely from a Windows machine with Powershell
Trials with Docker and Umbraco for building a portable development environment, plus find 4 handy tips inside!
How to create a low cost, highly available CDN solution for your image handling needs in no time at all.
What is the BFF pattern and why you need it.