How to Build, Train and Deploy Your Own Recommender System – Part 2
We build a recommender system from the ground up with matrix factorization for implicit feedback systems. We then deploy the model to production in AWS.


Prior to React v16.8, there was only one way to manage your state and that was to create a React Class Component and change it with setState(). Global application state was handled this way too.
As your application grows in complexity, such as when your component heirarchy grows to multiple levels deep, application state management becomes increasingly cumbersome as you will need to pass props through all the component heirarchy, even if only the last component needs it.
This is what we call the Prop Drilling Problem, and we want to avoid this condition. Ideally, we only want to pass props to the components that need it. In fact we want to avoid having to pass props if we can help it.
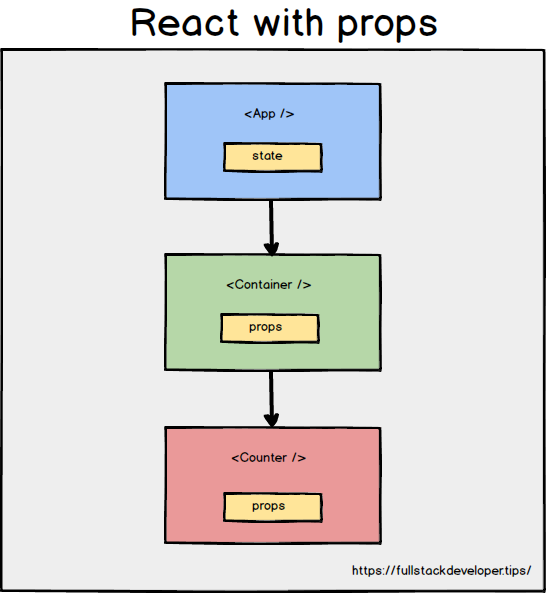
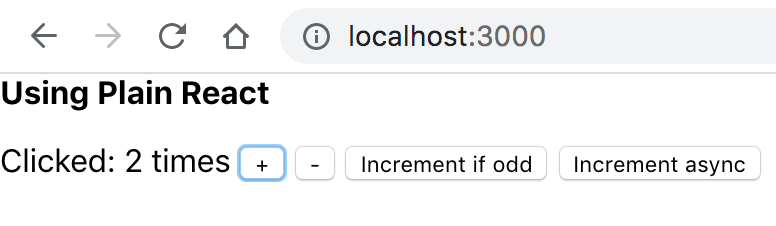
I have created a simple application that illustrates the prop drilling problem, see how props gets passed to all the components in the heirarchy, even if only Counter component needs it.
1
2
3
4
5
6
7
8
9
10
11
12
13
14
15
16
17
18
19
20
21
22
23
24
25
26
27
28
29
30
31
32
33
34
35
36
37
38
39
40
41
42
43
44
45
46
47
48
49
50
51
52
53
54
55
export default class App extends React.Component {
  constructor(props) {
    super(props);
    this.state = {
      count: 0
    };
  };

  // omitted for brevity

  render () {
    return(
      <Container appState={
        count: this.state.count,
        increment: this.increment,
        decrement: this.decrement,
        incrementIfOdd: this.incrementIfOdd,
        incrementAsync: this.incrementAsync,
      } />
    );
  };
};

function Container (props) {
  console.log(`Container: ${props.appState.count}`)
  return (
    <Counter appState={props.appState} />
  );
};

function Counter (props) {
    return (
      <div>
        <p>
          Clicked: {props.appState.count} times
          {' '}
          <button onClick={props.appState.increment}>
            +
          </button>
          {' '}
          <button onClick={props.appState.decrement}>
            -
          </button>
          {' '}
          <button onClick={props.appState.incrementIfOdd}>
            Increment if odd
          </button>
          {' '}
          <button  onClick={props.appState.incrementAsync}>
            Increment async
          </button>
        </p>
      </div>
    );
}
As an application becomes more complex, keeping application state in a top-level component, and passing props around everywhere may not be sufficient anymore. Redux can help with this, and more. Here’s more material around Redux motivations and what the motivations were when creating it.
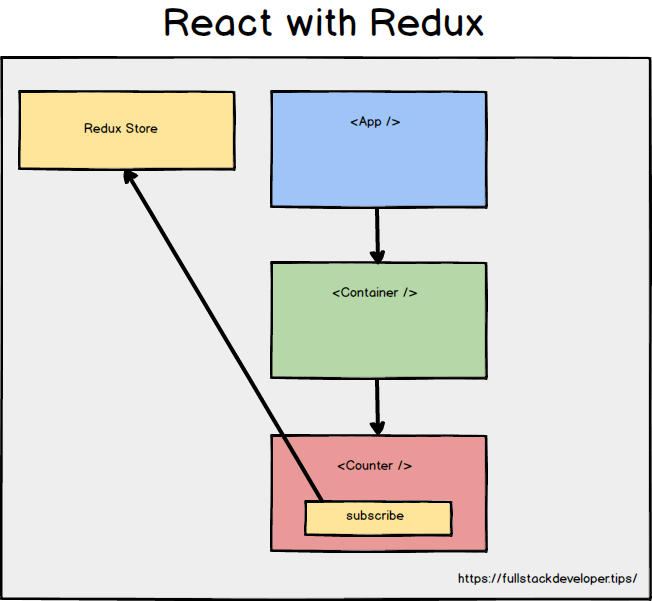
I don’t want to have to explain Redux as there are already lots of literature on this. What I would like to show is how Redux avoids the prop drilling problem by making the state available to any component that subscribes to it.
I have created a Redux version of the same application to see how Redux does it. To make Redux easier to manage in a React application (Redux can be used outside React too), the React bindings for Redux can be used, however for this exaple we are using plain Redux.
1
2
3
4
5
6
7
8
9
10
11
12
const store = createStore(counter);
const rootEl = document.getElementById('root');

const render = () => ReactDOM.render(
  <Counter
    value={store.getState()}
    onIncrement={() => store.dispatch({ type: 'INCREMENT' })}
    onDecrement={() => store.dispatch({ type: 'DECREMENT' })}
  />, rootEl);

render();
store.subscribe(render);
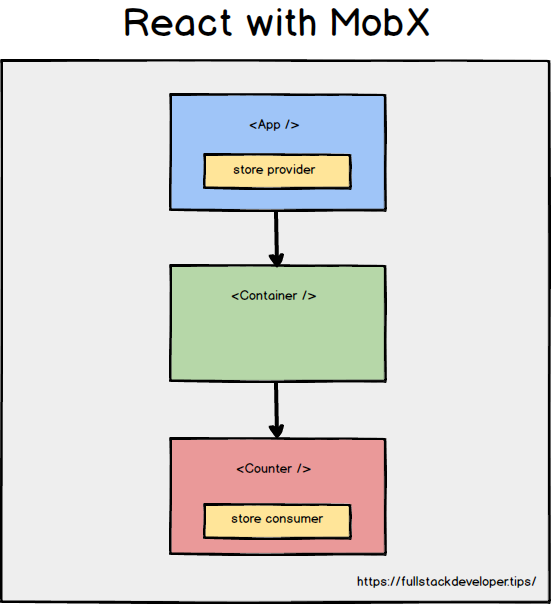
Redux (and the React Redux bindings), is quite full featured and robust, however, it can be a pain to use with all the boilerplate code you have to setup, don’t even get me started with using it with Typescript. When you are looking for an easier way, yet achieve somewhat the same results, you can try MobX.
I have again ported our simple example here to use MobX. None of the immutability rules that you have to remember when writing Redux reducers, welcome to reactive heaven. MobX allows you to create a store and mark them as observables. You can then instantiate an object, and mark it as an observer. Whenever you change your observables, any observer will re-rendered, just like magic.
It’s true, try it.
1
2
3
4
5
6
7
8
9
10
11
12
13
14
15
16
17
18
19
20
21
22
23
24
25
26
27
28
29
30
31
32
33
34
35
36
37
38
39
40
41
42
43
44
45
46
47
48
export default class App extends React.Component {
  render () {
    return (
      <Provider counterStore={new CounterStore()}>
        <Container/>
      </Provider>
    );
  }
}

const CounterContext = createContext(new CounterStore())

function useStore() {
  return React.useContext(CounterContext)
}

const Container = () => {
  return (
    <Counter />
  );
}

const Counter = observer(() => {
    const counterStore = useStore();
    return (
      <div>
        <p>
          Clicked: {counterStore.counter} times
          {' '}
          <button onClick={counterStore.increment}>
            +
          </button>
          {' '}
          <button onClick={counterStore.decrement}>
            -
          </button>
          {' '}
          <button onClick={counterStore.incrementIfOdd}>
            Increment if odd
          </button>
          {' '}
          <button  onClick={counterStore.incrementAsync}>
            Increment async
          </button>
        </p>
      </div>
    );
});
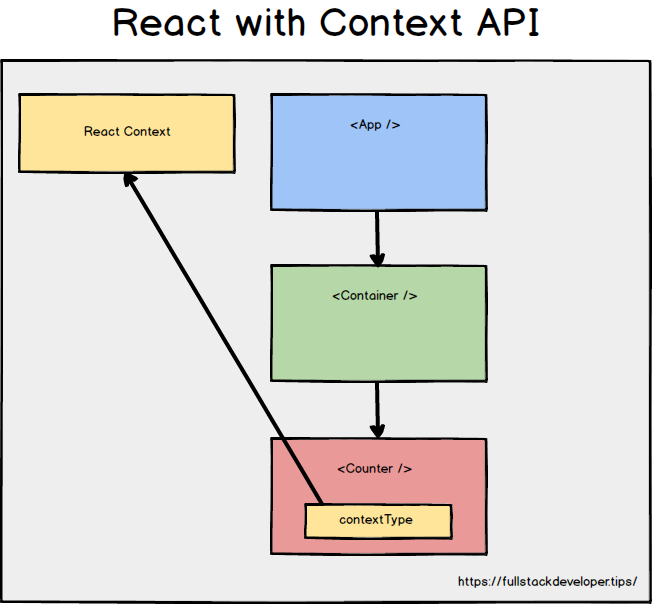
Before the new Context API was released, there wasn’t really an official React way of passing state around to different React components. We had to resort to the typical prop drilling method explained above. Or npm install Redux or MobX and their thousand dependencies. If you are using React, then you may already have everything you need right there.
1
2
3
4
5
6
7
8
9
10
11
12
13
14
15
16
17
18
19
20
21
22
23
24
25
26
27
28
29
30
31
32
33
34
35
36
37
38
39
40
41
42
43
44
45
46
47
48
49
50
51
52
53
54
55
56
57
58
59
60
61
62
63
64
65
66
67
68
69
70
71
72
73
74
75
76
77
78
79
80
const AppContext = React.createContext();

export default class App extends React.Component {
  render() {
    return (
      <AppProvider>
          <Container />
      </AppProvider>
    );
  }
}

function Container() {
  const { counter } = useContext(AppContext); // consume context in functional component

  console.log(`Container: ${counter}`)
  return (
    <Counter />
  );
};

function AppProvider(props) {
  const [counter, setCount] = useState(0);

  var increment = () => {
    setCount(counter + 1);
  };

  var decrement = () => {
    setCount(counter - 1);
  }

  var incrementIfOdd = () => {
    if (counter % 2 !== 0) {
      increment();
    }
  }

  var incrementAsync = () => {
    setTimeout(increment, 1000);
  }

  const value = { counter, increment, decrement, incrementIfOdd, incrementAsync };

  return (
  <AppContext.Provider value={value}>
    { props.children }
  </AppContext.Provider>
  );
}

class Counter extends React.Component {

  static contextType = AppContext; // consume context in class based component
  render() {
    var value = this.context;
    return (
      <div>
        <p>
          Clicked: {value.counter} times
          {' '}
          <button onClick={value.increment}>
            +
          </button>
          {' '}
          <button onClick={value.decrement}>
            -
          </button>
          {' '}
          <button onClick={value.incrementIfOdd}>
            Increment if odd
          </button>
          {' '}
          <button  onClick={value.incrementAsync}>
            Increment async
          </button>
        </p>
      </div>
    );
  }
With all these options available to us, of course it makes it confusing to decide on which method to use. You will just have to try it out for yourself. Maybe start with the simple contrived examples that I have created here. Like anything, you need hands-on experience to be able to pick one method from the other.
I used to pick Redux all the time. However, but once I saw how simple MobX makes things in comparison, I get that, and started using it more.
But ever since the new Context API has been officially bestowed the stamp of approval from React, I will probably consider it before reaching in my tool belt for Redux and MobX.
These picks are things that have had a positive impact to me in recent weeks:
We build a recommender system from the ground up with matrix factorization for implicit feedback systems. We then deploy the model to production in AWS.
We build a recommender system from the ground up with matrix factorization for implicit feedback systems. We put it all together with Metaflow and used Comet...
Building and maintaining a recommender system that is tuned to your business’ products or services can take great effort. The good news is that AWS can do th...
Provided in 6 weekly installments, we will cover current and relevant topics relating to ethics in data
Get your ML application to production quicker with Amazon Rekognition and AWS Amplify
(Re)Learning how to create conceptual models when building software
A scalable (and cost-effective) strategy to transition your Machine Learning project from prototype to production
An Approach to Effective and Scalable MLOps when you’re not a Giant like Google
Day 2 summary - AI/ML edition
Day 1 summary - AI/ML edition
What is Module Federation and why it’s perfect for building your Micro-frontend project
What you always wanted to know about Monorepos but were too afraid to ask
Using Github Actions as a practical (and Free*) MLOps Workflow tool for your Data Pipeline. This completes the Data Science Bootcamp Series
Final week of the General Assembly Data Science bootcamp, and the Capstone Project has been completed!
Fifth and Sixth week, and we are now working with Machine Learning algorithms and a Capstone Project update
Fourth week into the GA Data Science bootcamp, and we find out why we have to do data visualizations at all
On the third week of the GA Data Science bootcamp, we explore ideas for the Capstone Project
We explore Exploratory Data Analysis in Pandas and start thinking about the course Capstone Project
Follow along as I go through General Assembly’s 10-week Data Science Bootcamp
Updating Context will re-render context consumers, only in this example, it doesn’t
Static Site Generation, Server Side Render or Client Side Render, what’s the difference?
How to ace your Core Web Vitals without breaking the bank, hint, its FREE! With Netlify, Github and GatsbyJS.
Follow along as I implement DynamoDB Single-Table Design - find out the tools and methods I use to make the process easier, and finally the light-bulb moment...
Use DynamoDB as it was intended, now!
A GraphQL web client in ReactJS and Apollo
From source to cloud using Serverless and Github Actions
How GraphQL promotes thoughtful software development practices
Why you might not need external state management libraries anymore
My thoughts on the AWS Certified Developer - Associate Exam, is it worth the effort?
Running Lighthouse on this blog to identify opportunities for improvement
Use the power of influence to move people even without a title
Real world case studies on effects of improving website performance
Speeding up your site is easy if you know what to focus on. Follow along as I explore the performance optimization maze, and find 3 awesome tips inside (plus...
Tools for identifying performance gaps and formulating your performance budget
Why web performance matters and what that means to your bottom line
How to easily clear your Redis cache remotely from a Windows machine with Powershell
Trials with Docker and Umbraco for building a portable development environment, plus find 4 handy tips inside!
How to create a low cost, highly available CDN solution for your image handling needs in no time at all.
What is the BFF pattern and why you need it.